

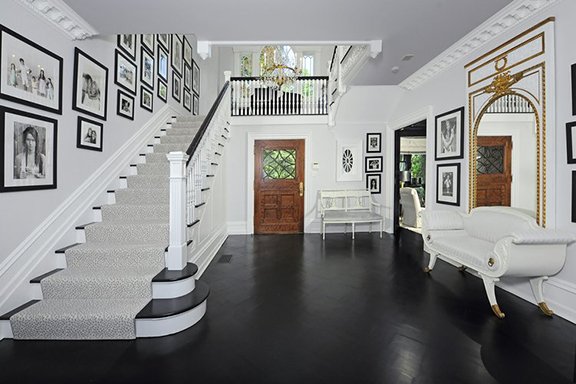
Photographs displayed in the main foyer and up the staircase wall in a stately home make and statement about the value of family.
I love a good photo wall, not just because I love photography, but also because displaying your family photos on a prominent wall in your home is such a great way to celebrate your family bond. After all, part of the reason I got into the business of family photography is that I wanted to help families come together to create something meaningful. What is more meaningful than showing off your beautiful family where everyone can see day after day how much you mean to each other? Displaying your family photographs is a great way to create a constant reminder of the timeless memories that we pass down to future generations. The best part is, you don’t need very much space to make it work.
Displaying a gallery wall in your home takes creativity and may be daunting. I have spoken to many of my clients who want to add this kind of personal touch to their home, but don’t know where to start. With this step-by-step guide, you can create a beautiful testament to the love you and your family share.
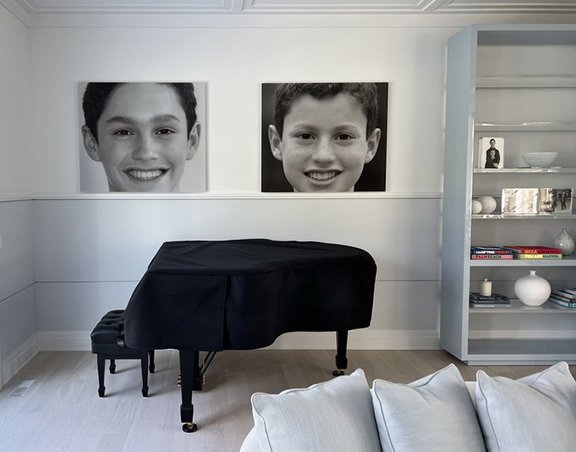
Large plexart photographs on the wall above the piano, fill this wall, and tell the visitor where these two young men belong.
STEP 1: Choose your wall
My favorite spots for photo walls are spaces where the display can serve as a focal point where there would normally just be large open white walls. That’s why hallways are great places for gallery walls. Whether you choose a long hallway between bedrooms, between the kitchen and living room, or a wall along a staircase, these spaces are underused in most homes. Consider building an angular gallery design along the stairs to draw the eye upward and create the look of higher ceilings, or a sleek grid design on a family room wall to level up the vibe of your space.
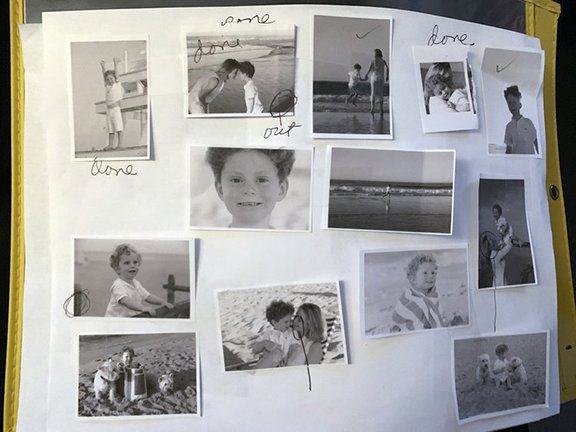
Laying out xerox prints on a white board, helps you choose the photos that work together, as well as tell a story.
STEP 2: Choose your photos
This is the tricky part. You love all your family photographs, but not all of them can go on the wall. I like to combine posed photos with some real life moments. All formal family portraits can create a look of sterility, rather than warmth, which is why it is great to have a few more candid shots mixed in with the picture perfect moments.
Choosing a few larger photos as anchors and adding smaller frames around it is another great way to add some interest to your wall, so that it doesn’t look uniform.
Consider the look of your home when choosing your photos. Black and white photography can look sleek in an urban dwelling, while family photography on the beach displayed in full color might fit an oceanside home. Either way, I recommend choosing a few larger photos as anchors and adding smaller frames around them. This is a wonderful way to add some interest to your wall and make sure it does not look too uniform.

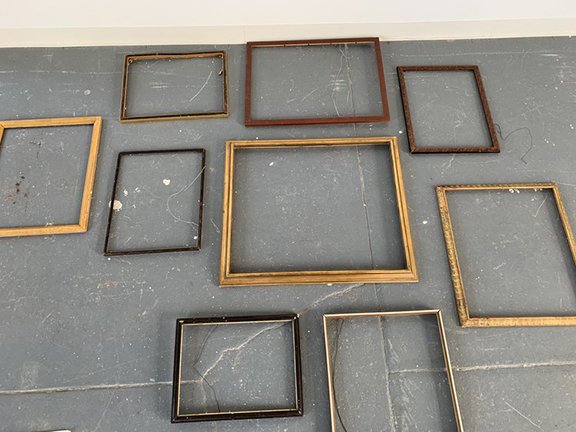
STEP 3: Decide what style of frame to use
Identifying your personal style is going to be important here. Do you live in the city? Combining modern neutrals, black and white, or silver with a thick mat gives your photos more depth and adds a luxurious, high-end feel. At a beach house, I love the look of warm touches, like brown, white, or other muted shades. Match your gallery wall to the aesthetic of your home, whether that means choosing vibrant colors for a beach house, or the rustic elegance of a plain wooden frame for your country abode.

Place paper copies of photographs to size on wall, before making the final investment
STEP 4: Layout your photos first
Don’t just get the hammer and start making holes in the wall just yet. Your fresh paint and wallpaper will thank you. I recommend first laying out your photos on the floor below the wall that you are planning to use. Take a step back to get a better perspective. Measure 2-3 inches between each frame to ensure your spacing isn’t clumsy. You may want to keep the layout on the floor overnight so that you can get a second look the next day, before you start hanging the photos on the wall.
If you struggle with this part, you can take advantage of my wall design services. At Lucille Khornak Studio, we can help you measure, pick photos, and arrange the layout. Then, we combine all these elements to create a virtual prototype of your wall, before you ever lift hammer to nail.
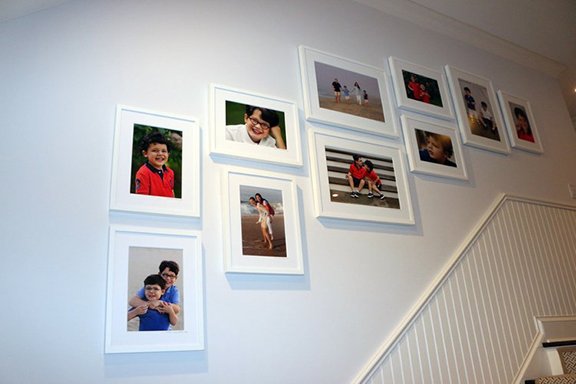
Family photos up the stairway wall. Natural light is good, as is an open space, just make sure there is no direct sun.
STEP 5: Hang
Now you can hammer away! This is the easy part. Hire someone to do this part or get a little arm workout. You can even call our studio to hang the photographs for you, if you’re not into hammering holes in your walls.
Once they have been hung up, step back and admire.
STEP 6: Change your wall as your family grows
Your family doesn’t stay the same as time goes by and your photo wall doesn’t have to either. Depending on the size of your home, pick 3-10 new photos for the wall each year.
Once your wall is filled, update your family wall by changing out a few of the photographs each year, while keeping the same frames and mats. Store the photos you’ve decided to take down in an archival box to pass your old photography on to your children as they get older. Someday, when they are adults with families and are ready to display their own photographs, they will love having photographs from their childhood to add to their own photo wall.
Creating a gallery wall doesn’t have to be a headache. Remember, it is about letting your personal taste shine, but also about celebrating your bond with your loved ones. When you display your professional family photographs on your wall, you show your family unit and visitors alike that your house is not just a house, but a home.
This video shows four walls of my clients favorite friends photographs displayed in her guest bathroom. Every year her furry friends do a new theme, from “Breakfast at the table with their own signature dishes” or “Driving their fire truck” or “Watching their fav 101 Dalmatians”. They get so excited to see arrive with the cameras - “Oh no, it’s that time again” :-)

Mixing color photograph with black and white can be challenging however the results can be beautiful. The mix of different frames has to be taken into consideration to make your wall look like a professional photography wall.
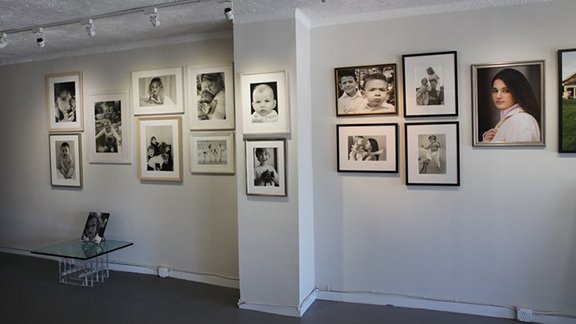
My wall display from the Southampton Gallery.